Friday, November 29, 2013

Day 333) Water spotted Christmas nails

This week's challenge on NPQ (and you should all join the fun) is 'water spotted nail art'.
I'm not new to this technique and even made a tutorial for it back then.

Never the same nail art twice, so I needed to make it a bit different.

This time a Christmas version.

I've started with a great green Christmas polish by China Glaze:


China Glaze Happy HoliGlaze Collection 2013 - This is Tree-mendous

A clear base filled with gold (which shows silver in pictures)  and green micro glitters. It's amazing how it looks; when you look up close to the nail it looks like there is more gold than green but this should not be possible because it's definitely a green. To be opaque it needs 2 to 3 coats but it applies easily and dries pretty fast.
In conclusion: A verry pretty green for the Holidays :D

Next I took my water marble cup and dropped some red polish in it:
Catrice Ultimate Nail Laquer Limited Edition Thrilling Me Softly C04-Allure

Then I took a free perfume sample and used it to spray on the polish.
Depending on the polish and the perfume you use it's common to get small spots with one spray.
The more times you spray the bigger the spots...it's a polish monster...eating the polish away.
So, knowing this I tried to capture it on my nails


Index is one spray, the rest more and more (each time eating more polish and therefore showing more of the base color).
I prefer the ring and pinky but maybe that's just the color combo.

Now, to put some more effort into it I did a nail art on the middle and ring finger: Christmas bells


Polishes used:
* China Glaze - This is Tree-mendous (base)
* Catrice  - Allure (water spotted)
* China Glaze - Just Be-Claws (bow)
* Catrice - Black To The Routes (outlines)
* Rimmel Space Dust - Total Eclipse (rings on bell)
* Maybelline - Winner takes it all! (bells)

Wednesday, November 27, 2013

Day 331) Happy Thanksgiving

We don't celebrate Thanksgiving Day in the Netherlands.
I actually didn't even know what it meant.
But thanks to Wiki and everything I read about it here on G+ I guess it's a Holiday on which friends and family come together to say thanks for all the beautiful things they have in life. Bless the Harvest.
I wish we had a Holiday like that here!
We only come together with friends and family on our Birthdays and with Christmas (2 days) it's common to celebrate one day with your own family and one day with the in-laws.
We are quite to ourselves nowadays...it seems we are all too busy to spend time with each other and be thankful for what we have.

So, may you have a happy Thanksgiving Day tomorrow and enjoy!


Index: Turkey feathers
Middle: Shaking hands in heart shape
Ring: Fanbrush design with Thanksgiving Day colors
Pinky: Turkey

Tuesday, November 26, 2013

Day 330) Nail art skier

Pffff.....And here is today's nail art :D


Day 330) Finding perfect snow nails (part 2)

And here is my part 2.
Again all with the same white polish as base: Claire's White

For the part 2 nails I used the following:


Cotton ball (just a little bit)


Pupa Crazy Lurex (bar glitter in a kind of cotton stuff)


White holo glitter


Salt


Without topcoat.

If you want the nails to last, you'll need a topcoat for all of them.


With topcoat.

You'll lose some of the fluffiness from the cotton and the salt will absorb some of the topcoat.


Findings:
Most pretty: Pupa Crazy Lurex and white holo glitter
Best snow look without topcoat: Cotton (fluffy snow) and salt (powder snow)
Best snow look with topcoat: Cotton
Easiest to work with: Pupa Crazy Lurex, white holo glitter and salt (easiest to clean cuticles)

My winner: Cotton (full nail), salt (nail art), glitters (pretty nail art).


Putting part one and two together:
For the best snow look without topcoat: Artificial snow
For the best snow look with topcoat: Deco snow and Cotton

Day 330) Finding perfect snow nails (part 1)

I've been on a quest to find the perfect snow nails.
With perfect snow nails I mean the stuff you could use to create the best snow look.
I've been looking for glitter snow paste that they use for crafting but it's only available at art-/hobby/-craft stores and there isn't any near my place.

So, I ended up trying other stuff.
For all the nails shown today I've used a white base (Claire's White)
For the first nails I used the following:


Decorative snow


Claire's 87688 Fluffy


Granulated Sugar


Artificial snow


This is without topcoat.


If you want your nails to last you'll need a topcoat for the deco snow, sugar and artificial snow.


This is with topcoat.

As you can see you're losing some of the fluffiness from the deco snow and a lot of it from the artificial snow.


Findings:
Most pretty: Claire's fluffy
Best snow look without topcoat: Artificial snow (by far)
Best snow look with topcoat: Deco snow
Easiest to work with: Sugar

My winner: Deco snow (full nail), Artificial snow (nail art)

Monday, November 25, 2013

Day 329) Nail art icicles

Still in the frosty mood :D
I guess I'm more of a winter than a fall person.
Today icicle nails.


I've started with a dark blue background Catrice Ultimate Nail Lacquer 350 Hip Queens Wear Blue Jeans!
Then I've used a striper brush to paint the letters Bourjois 06 Adore-bleu and colored it in with OPI liquid sand mini Kiss me at midnight
After this I've used the same brush to paint the icicles Claire's 60553 White
I felt it was still missing something so I ended with a little sparkle around the cuticles NYC 003 Disco Inferno


Sunday, November 24, 2013

Day 328) Nail art snowflakes

Today's nail art turned out to be one of my favorites so far.
I've started with a sponged gradient from dark blue to silver and even on its own it is already very pretty ♥

Polishes used:
- China Glaze 1200 Water you waiting for
- NYC 208 Pier 17
- Rimmel Cocktail Colour 130 Apple berry smoothie
- Essie Beyond Cozy

Then I used a striper brush and white polish to paint different kind of snowflakes.
Polish used:
- Claire's 60553 White

Hope you like it as much as I do!!!


Saturday, November 23, 2013

Day 327) Nail art Winter!

I have so many ideas for Christmas themed nail arts...I can't wait!
But in the Netherlands it's not done to even think about Christmas before Sinterklaas his return to Spain (on December 6th).
So, I'll be saving those for after the 6th.
Meanwhile I'll be throwing some winter nail arts in cause December will be mostly Christmas ;D

Friday, November 22, 2013

Day 326) Matte abstract nails

Party time tonight!
I decided to make something simple and abstract because...well, I'm a woman and I need the rest of the day for making myself pretty ;D

I finished the look with a matte topcoat.
And, if you change the purple with gold this would be a great design for the Holidays.


Polishes used:
- Etos 124 (no name, teal)
- China Glaze 1252 Just be-claws
- Essence Beauty Beats 01 Baby, baby, ooh!
- China Glaze Matte Magic

Thursday, November 21, 2013

Day 325) Nail art winter fun

Last night we had our first snow.
It's not cold enough yet so it was al gone in the morning.

I love snow! Better than rain ;D and I'm looking forward to the Winter.

Therefore a winter nail art with snow fun: making a snowman together.
And I finally got the chance to use my white sand!


Wednesday, November 20, 2013

Day 324) Reverse gradient

I don't know the exact name for today's nail art.
I've seen something simular before from other people. So, maybe someone can help me out with this?
I call it 'reverse gradient' but 'gradient on gradient' could also be a good name.

You start with a gradient and then make a design by using a reverse gradient.
Huh?

Take a look at my nail art and I'll explain:

 
I started with a sponged gradient (blue to pink).
Then I've placed dots in reverse on index, middle and pinky (pink dots on blue and blue dots on pink).
On the ring finger I placed striping tape on the first gradient. Then I sponged the reverse gradient
(Striping tape design: 1st gradient, rest of the nail: reverse gradient).
 
Interesting effect isn't it?
 

Tuesday, November 19, 2013

Day 323) Pupa Crazy Lurex


Today I want to show you this set by Pupa:

Pupa Crazy Lurex Holographic Microfibres
This set contains the following:
- A pearly nail polish
- A brush
- A jar with holographic microfibres
Let's start with the pearly nail polish. On the picture is two coats of Pupa P249 115:
This is such a beautiful polish!
It's pearly and has a delicate shimmer which makes it suitable for any occasion. Very elegant, graceful and classy.
It applies easy and two coats gives a perfect coverage.
Although there is a tutorial on the back of the package...of course I haven't read it (yeah, just like a man).
But I guess you are supposed to apply one coat let it dry and use the second coat as glue for the microfibres.
For the swatch I wanted to have good coverage so I've use a topcoat as glue for the microfibres.


I've worked nail by nail.
Starting with a layer of topcoat and generously sprinkling on the microfibres (you might use something to catch the surplus microfibres). Then I shaked my hand to get rid of some extra.
After finishing all the nails I've used the brush gently over the nails and to clean up the cuticles.
I'm very happy with the outcome (picture doesn't really do it justice). It does have a holographic effect and it's just sparkling in any light.
I love it, it looks kinda snowy :D
Great for a winter mani or for the holidays to bring that sparkle!!!
I do think the set is a little expensive as there are many cheaper alternatives...maybe holographic microfibres are already sold somewhere...
So, I hope Pupa gets smart and makes it less expensive.
 
 
For the nail art I've done a simple snow star:


Monday, November 18, 2013

Versatile Blogger Award

I've been nominated for the Versatile Blogger Award...twice :D


Therefore a big huge thank you for my dear followers who nominated me:
 
Their blogs are lovely.
When you have time and aren't a follower yet, please pay their blog a visit and get hooked like me!
 
 
What is the Versatile Blogger Award?
The VBA honors those bloggers who bring something special to your life whether it's every day or only now and then.
 
Versatile Blogger Award rules:
If you are nominated, you’ve been awarded the Versatile Blogger award.
  •  Thank the person who gave you this award. That’s common courtesy.
  •  Include a link to their blog. That’s also common courtesy.
  •  Next, select 15 blogs/bloggers that you’ve recently discovered or follow regularly.
  •  Nominate those 15 bloggers for the Versatile Blogger Award — you might include a link to their page/blog and let them know they've been nominated.
  •  Finally, tell the person who nominated you 7 things about yourself.
 
Here are my nominees:
 
12) Painted fingertips & blog
 
7 facts you don't know about me:
1) I'm such a chocolat addict that I can gain weight in a very short time
2) I smoke (and am not proud of it) and drink (which I don't see as a problem ;D)
3) I'm a loner (I have a huge wall around me that takes time to break)
4) Until my early 20's people always said that I wasn't artistic (I was more of a nerd)
5) I don't have a driving licence :(
6) My hubby is 22 years older and we've been together for almost 6 years now (3 years married)
7) Happiest moments: when my hubby/children tell me they love me :D
 

Day 322) Cut the rope nail art

This week's challenge is "Gamer geek".
I don't have time to game anymore, but when I have time I can be addicted to a game for quite some time.
On the PC I play games like Dream Chronicles, poker, Settlers of Catan, Rummi, Candy Crush and Bubble Witch Saga.
On the Wii I play Zelda, Guitar Hero and Just Dance.
And App wise it's brief playing of different games like Cut the rope, Angry Birds, etc.

I've done some game nails before which you can find here and here, so I wanted to skip these.
But hey it would be a challenge to do some more game nails so I couldn't really resist ;D

For today's nail art I've used the following image as my inspiration:


Sunday, November 17, 2013

Day 321) Nail art star and moon

Today I just want to show one of my favourite glitter polishes for the Holidays (read: any Holiday).
Therefore the nail art is secondary but still tried to make something cute though.

China Glaze - Marry a Millionaire (3 coats)

Marry a Millionaire is a clear polish richly filled with different glitters.
There are purple and pink microglitter and a lot of multicolor/holo bar glitters.
This mix constantly changes in every different light, room, environment and you get totally lost in it...as does my camera ;P
Applying is quite easy as it spreads evenly and you don't have to fish for glitter.
Opaque wise it needs at least 3 coats (see picture above) but 4 is the best.
If you leave some drying time in between the coats (few minutes) you'll get the best outcome and easiest way for applying.
This nail polish is very suitable for a party or Holidays!!

Saturday, November 16, 2013

Day 320) Bright December moon is beaming...

Today Sinterklaas had his arrival to the Netherlands.
We've been watching a bit on TV and went to town to see his arrival there as well.
I couldn't go without Sinterklaas nails.
So here is another Sinterklaas nail art.
This one is inspired by a Sinterklaas song the children sing.

I have a quite literal translation of this song in English:

See the moon shines through the trees,
Mates, stop your wild roars.
The delightful evening has arrived.
the evening of Sinterklaas.
Full with expectations beats our heart,
who'll gets the cake, who'll gets the whisk.
Full with expectations beats our heart,
who'll gets the cake, who'll gets the whisk.

But a more correct translation would be (according to an English digital school):

Bright December moon is beaming
Boys and girls now stop your play!
For tonight’s the wondrous evening,
Eve of good St Nicholas Day.
O’er the roofs his horse unshod
Bring us gifts or else the rod.
O’er the roofs his horse unshod
Bring us gifts or else the rod.

Well, enough about the song.
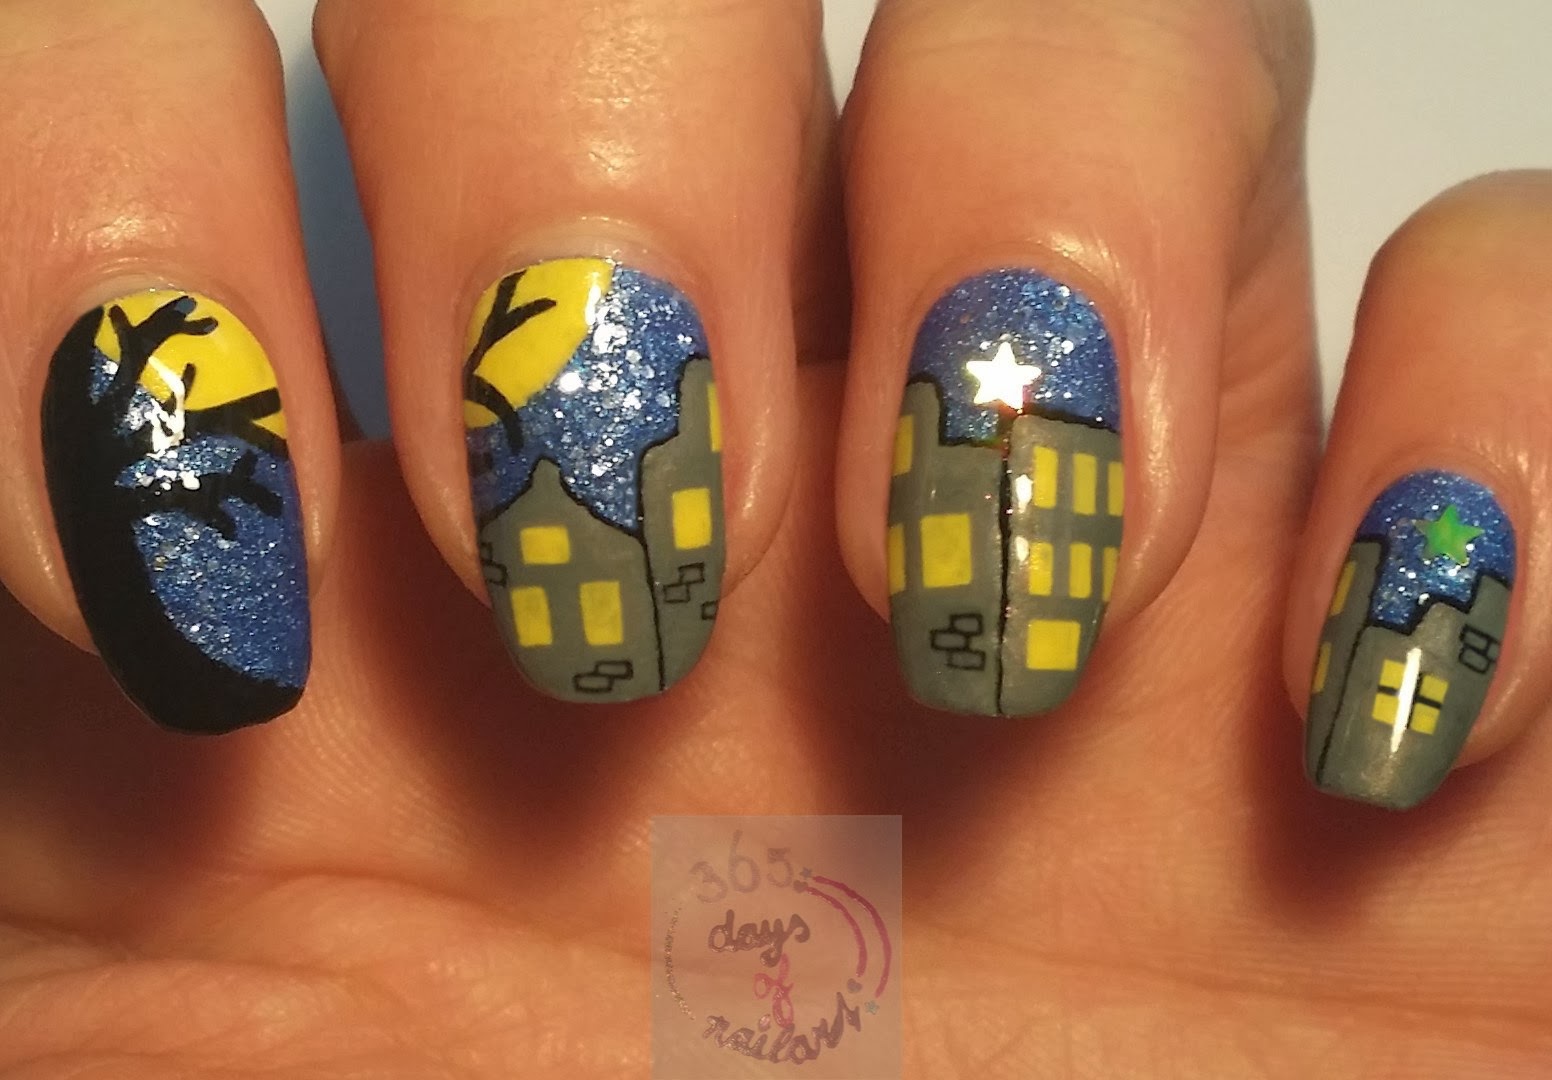
I've painted an evening with moon and tree and houses.
This is simular to the images that go with the song.

Friday, November 15, 2013

Day 319) Essence trend edition Beauty Beats

Essence came out with another trend edition called Beauty Beats (Girls on tour with Justin Bieber).
As an official make-up partner they present this edition inspired on Justin Bieber's world tour "Believe".
Partnering with whomever, doesn't mean you can't buy/like it!
So, this edition is for all the beauties and J.B. fans.

This edition comes with 4 polishes:

From left to right:
- As long as you love me 03
- Groupie at heart 04
- I'm backstage 02
-  Baby, baby, ooh! 01
 
These polishes all contain a very subtile shimmer (which doesn't show good on the pictures) and even in real life you'll have to look up close.
Colorwise (but this could be due to the overload on the recent fall colors) I really love the middle ones.
For the nail art I decided to stay with the theme: Justin Bieber's world tour 2013 "Believe"
but to create also something that everyone can like (even if you're not a Belieber).
 

Thursday, November 14, 2013

Day 318) Nail art rainbow feather

Ever since I saw this nail art:


bedizzlenails.blogspot.com


I've been wanting to do something simular.

Mine didn't turn out as good as the one above but I'm still very happy with the outcome...
Black and some bling are the ingredients for a beautiful mani IMAO.


Wednesday, November 13, 2013

Day 317) Science nails

A little short on time.

Today a science nail art.
I sucked at science...I only remember those sleepy classes with a quite old stately teacher that pointed things out on the black board with his middle finger (and as I was thinking: F*** you too) :D
Pardon my language.


Tuesday, November 12, 2013

Day 316) Movember nail art

Today another Movember nail art.
As inspiration I've used this image:


Here is a swatch of my base color (2 coats):

 
Rimmel Cocktail Colour in a flash 130 Apple berry smoothie


Monday, November 11, 2013

Day 315) Elegant half moon mani

I my opinion it was time for a simple and elegant nail art again.
This nail art is great for winter and coming holidays.

First a swatch of my base color:

Color Club In true fashion - First looks
 
This is one of the most prettiest dark teal colors that I've ever seen.
In the bottle the color looks darkblue with a touch of purple and green.
On the nails the color is so dark (blue) that it almost looks black, but there is a beautiful teal shimmer that lightens the total look.
Almost opaque in 1 coat.
Perfect color for fall and winter.
 
For the half moon mani I used the following:
* OPI Mariah Carey Holiday 2013 Collection mini pack liquid sand - It's frosty outside (silver glitter liquid sand)
* Silver beads
* Rhinestones
As inspiration for this nail art I've used a necklace


I think this nail art is also great for winter/Christmas because you could see some icicles  in it as well.