Showing posts with label gold. Show all posts

Monday, December 15, 2014

Five Gold Bling

On the 5th day of Christmas NPQ gave to me...


Five Gold Bling


Five Gold Bling:
1) Gold champagne glasses (water decals that I received from my dearest friend +bubica vucko )
2) Gold Christmas ornaments (small gold hexes and gold chain)
3) Gold Christmas sock (polish+iredescent flitter)
4) Gold heart shaped nail piercing
5) Gold Christmas tree (gold caviar/nail beads and gold star stud)


Wednesday, September 10, 2014

Lace nails

It's been such a long time since my last entry for the weekly challenge over at Nail Polish Queens (NPQ) community.
Which is actually sad because I really like those weekly challenges and the community!

This week the challenge is: Lace
Although I consider myself more of a free hand painter, lace is a thing that looks just weird when I'm doing it free hand.
And, let's be honest, the lace patterns on stamps and decals are out of this world!

Today I bring you another nail art with the use of water decals.
And again, these came from Born Pretty Store.

Let's have a look at them :D


As you can see there are black and white lace patterns and I immediately had to think about a wedding themed nail art.

As a base for my nail art I've used this gorgeous polish by Dance Legend.
Anna Gorelova by Dance Legend 03 Gold Fish
Gold Fish is a sheer platinum gold filled with larger scattered holo particles that look like white gold particles without direct lighting,
A polish really suited for wedding nails.
However, when I started applying this polish it was kind of sheer. It did build up but it took me about 5 coats to have it as I please.
Application was really easy and I was able to apply the other coats very soon after the previous.
But...I smudged a nail right after finishing application and had to start all over again.
I decided to make it more easy for myself by using a 1 coater platinum gold as base for the Gold Fish...leading it to be used more as a topcoat.
The color underneath Gold Fish is:
Maybelline Forever Strong Pro 820 Winner takes it all!

I cut the water decals so I could make a V-shape (Chevron).


I'm really pleased with the elegance.
What do you think?


Wednesday, October 2, 2013

Day 275) Nail art abstract

I recently saw a swatch of a polish with holo glitter and just needed to have it (for Christmas of course ;D).
I swatched it for you and here it is:


Kleancolor Nail Lacquer 137 Holo Yellow
 
 
The nail lacquer above can be described as a goldish yellow with holo glitter.
Holo glitter (which can't be compared to complete holo's) gives a more subtile holo effect.
This polish needs light! Otherwise it wil just be a plain dark yellow/goldish look.

The polish covers in 1 coat but there will still be a difference between tip and the rest of the nail.
Above is 3 coats.
Drying time is very slow. And I'm always in a hurry so that's no plus.
If I have to apply more coats I want to apply them as soon as possible after one another.
The complete look also has to dry fast because with 4 kids it's only a few minutes and there will be the first bump. They need to be kid proof as I like to call it ;D
This one isn't.
 
But for 4$ I'm happy with it.
Great polish for holidays and summer!
 
 
For the Nail art I just wanted to use some other sparkly nail polishes :D
I ended up with an abstract design


Polishes used:
- Kleancolor Nail Lacquer 137 Holo Yellow
- Color Club 959 Sparkle and soar
- OPI Coutere de Minnie Cover Magazine Mouse
- Color Club AWA04 Gift of sparkle

Sunday, July 7, 2013

Day 188) Black and gold pattern

I don't know how others work with this kind of temperatures.
Some of the polishes I bought are already gloopy.
I don't have any thinner here and I don't want to ruin my polish with remover.
So, I thought it was best to work with my best polishes today; black and gold.
After removing a dozen of nailarts I ended up with this one:


I started with the black nail polish.
Then I used a striper brush and gold polish to make cat eye shapes. In the middle of these cat eye shapes I painted litlle squares.
At last I used a dotting tool and the black polish to make dots in the middle of the little squares and at the centre of 4 cat eye shapes.

Wednesday, May 29, 2013

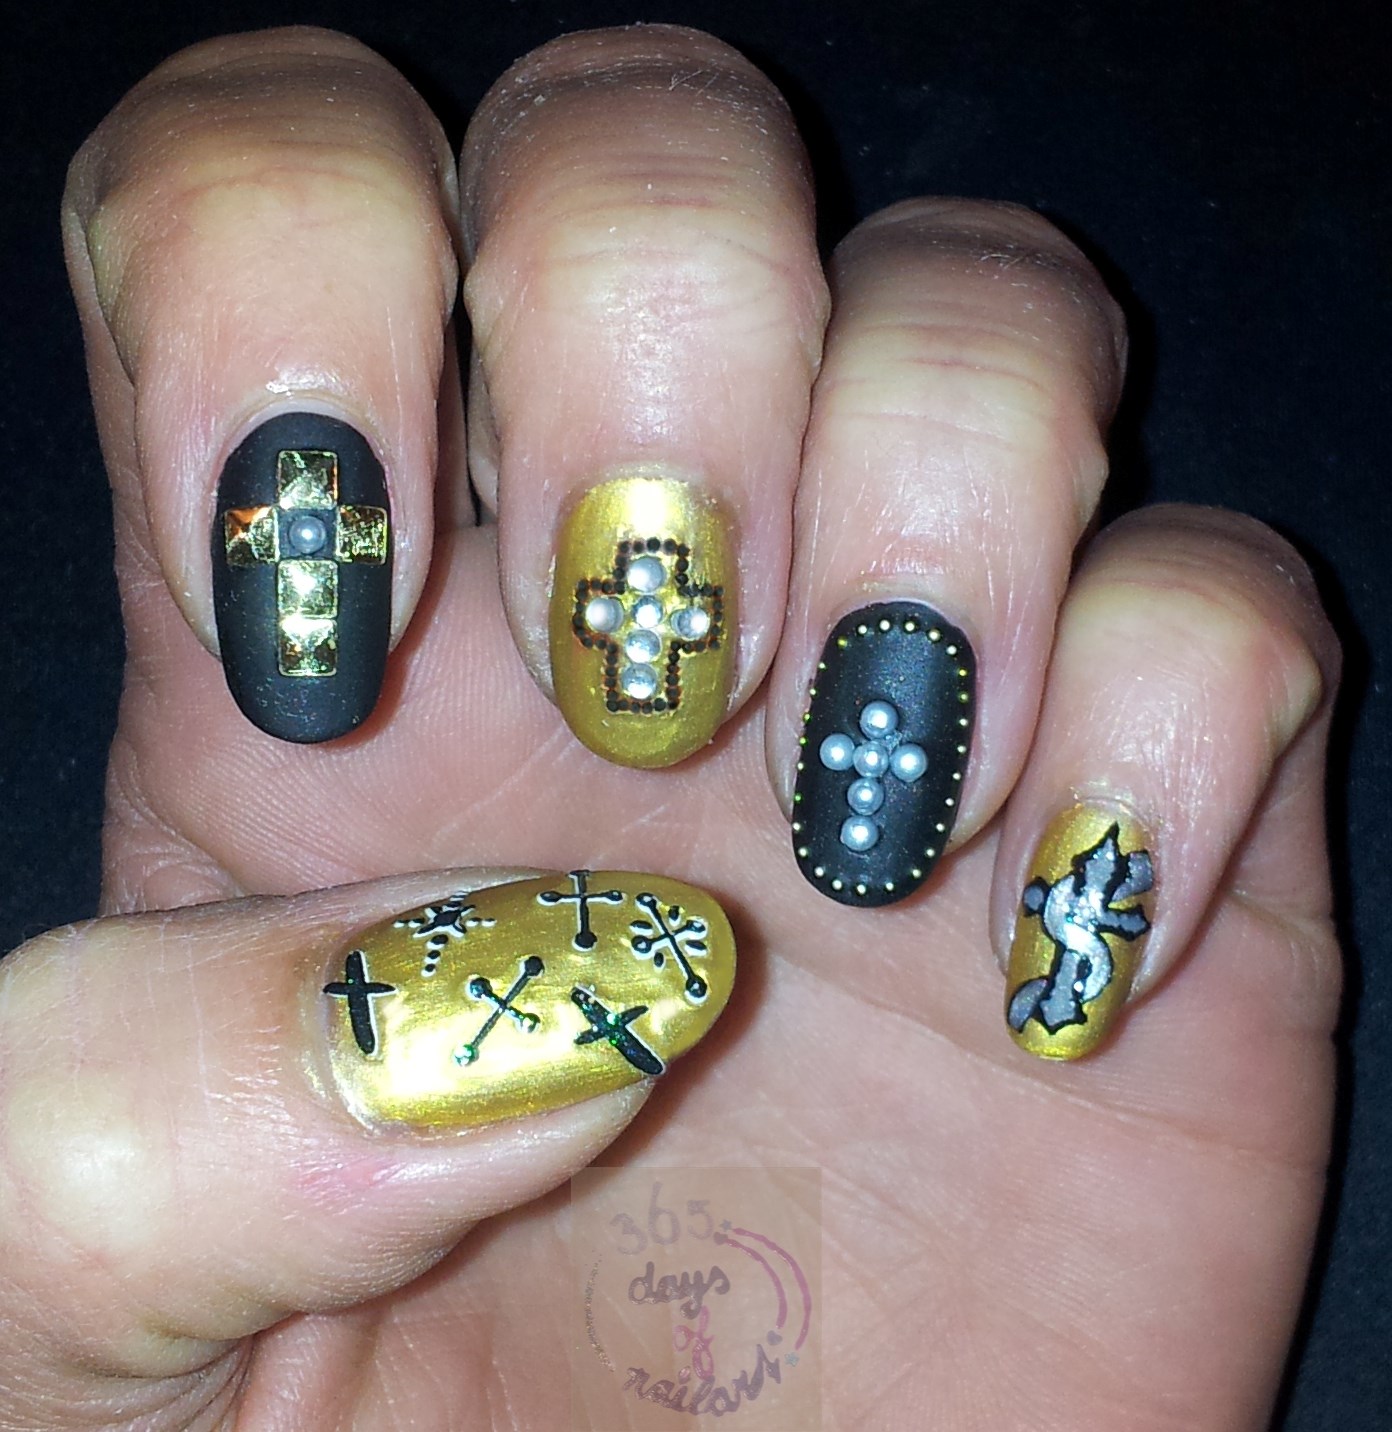
Day 149) Nail art crosses

I've had a request for nails with spikes today.
Only webshops provide these. So, that's an upcoming nail art.
However, I did immediately think about rock nails.
And there are always crosses on rock themed nails.
Today's nail art is only about crosses.


First I painted my nails with a gold and black nail polish. I finished them with a matte topcoat.

Thumb: Max & More (Action store) nail stickers
Index finger: Square studs and pearl
Middle finger: Rhinestones and black beads (on the picture the gold gives the beads an orange look)
Ring finger: An outline of golden beads and a cross made of pearls
Pinky: Striper brush design. I made the outer lines of the cross with a black nail polish. Then colored it with a dark grey. The snaky thing is in silver. (In real life there's a big difference between the grey and silver, but this doesn't show well on the picture)

Hope you like them!

Sunday, May 12, 2013

Day 132) Très chic

Actually I wanted to do another Mother's Day nail art but I just couldn't think of any design.
After the heavy velvet I was sure I wanted something simple and delicate again.
Something chic and elegant...something more me!
Today's nails are chic and easy to do.

1)
First I divided my nails into 3 not even parts.
These 3 parts all got a different colour.
The colors I used are:
- Catrice Ultimate Nail Lacquer - 800 Heavy Metallilac (the purple colour)
- W.I.C. by Herome Limited Edition Magical India - 201 Jaipur (plum colour)
- Catrice Ultimate Nail Lacquer - 840 Genius in the bottle (goldish colour)

I used a nail art brush and painted the parts freehand but you can always use tape for a more neatly design.


These colors look great when you use them on the whole nail and paint them with the brush that comes with the polishes but in this design it shows the brush stripes that I've made.
I don't like it and this is not the look I was aiming for.

2) I decided to use a matte topcoat for a more chic design.
The matte topcoat I used:
-Miss Sporty - Check matte


Already a chic look I think but still I was looking for the 'tres' chic.
I went through my stuff and found the beads. Yes, this was going to be my 'tres' in 'tres chic' :-D


These nails are more 'me' and I love them.
How about you? Love or hate?

Monday, April 29, 2013

Day 119) Nail art Queensday

Tomorrow is the abdication of our Queen Beatrix and the investiture of Prince Willem-Alexander.
A day in history for our small country The Netherlands.

Of course I have to do a nail art about this:


On the left you see a homemade waterdecal of our Queen Beatrix en on the right is our new King Willem-Alexander.
The rest is hand painted.

Saturday, April 27, 2013

Day 117) Kingsday nail art

Today is Kingsday in the Netherlands.
Not official yet because the crowning is on Tuesday when it's Queensday.
It's been a while since we had a king so everybody is very excited and already celebrating this day.

For this day I have to do some national nail art.
Less interesting for you guys....??
No! You can still use the designs in different colours or make your own national nail art with it.


 These colours are my base for the nail arts.
N.B. Our flag contains red, white and blue and the colour we use at special events like the Olympics, Queensday is orange.

1)


I started with some randomly placed red dots. For this I used a dottingtool. After the reds I did some orange dots and finished it with some blue dots. Outcome: Dutch confetti

2)


First I made a gradual design with white on the middle of the nail.
I do this because my red and blue aren't good for 1 coat. At least not when they are applied on darker colours like the orange.
The first step gets a red colour. The second a white and the third a blue colour. I like to give my designs some golden accents because of the king/queen. But it also gives the opportunity to disguise some failures.

3)


Start by making a crown.
Make two ribbons underneath the crown.
Give the ribbons the colours of your flag.
I detailed the nail art by giving the crown some gold (bottom) and gold glitters (outlines).

4)

For this design I simply used the same technique as you would do to make a tigerprint.
Place stripes alternately. Starting thicker on the outside and thinner at the inside.

5)


Start by making some balloons.
Then give the tip of the nail your flag colours by using something simple to apply (beads/billions/caviar, velvet or in this case glitters).
Use a brush to paint one stripe of clear coat on the desired place. Glitter it. Then apply the second stripe of clear coat and glitter it. Do the same for the last colour.

Total look for Kingsday