Wednesday, July 31, 2013

Day 212) Liquid sands nail art

I worked my but off today and I'm really tired.
Today is a very simple nail art again.
As compensation I'll show you my new purchase ;-D

Artdeco - 53 Sparkling Sand Nail Lacquer
(Douglas)

I decided to paint 4 of my nails with this beautiful golden liquid sand version and make a nail art on the ring finger nail as an accent.

For the nail art I used some stencils:
Wynie Accessories - Ref. 570601

I already did a Chevron nail art. So, for today's nail art I used the left ones.
After the basecoat I applied two of the stencils on my nail.
Then I applied the golden liquid sand on the free parts:
I removed the stencils and I filled the open spaces with another liquid sand that I own: OPI Couture de Minnie - Magazine Cover Mouse.

Here are today's nails:

And the winner is...

A few days ago I celebrated my 100+ followers and now I'm already at 150!
Thanks everybody for kindly supporting me!
I guess you're waiting for my 250 followers giveaway huh ;-D

But first things first...
The winner of this surprise giveaway is....


Congratulations!!!
If you could please send me an email at 365daysofnailart@hotmail.nl including your name and address

Tuesday, July 30, 2013

Day 211) Me & My Ice cream Essence (swatches+nail art)

Today another trend edition.
"Me & My Ice cream" by Essence:


From left to right:
 
- 01 Ben & Cherries
- 02 Always in my mint
- 03 Ice, ice baby
- 04 Icylicious
 
Of course I did some single nail swatches:


First of all the colors are very light. You need at least 2 to 3 coats to get good coverage.
At the second thin coat I even questioned myself if Essence had changed the brushes, because I still could see some lines in it.
After 3 thin coats it looked great!
The colors are very sweet, I would say: "adorable".
I do think the light pink and lila look too much a like...especially when you use them close to each other (as on the picture) you only see a slight difference.
The finish is glossy (I didn't use any topcoat on the picture above) and there is some pearly shimmer in it.
This trend edition looks a lot like the limited edition "Candy Shock" by Catrice.
But who cares...you can never have enough light and bright colors (IMO)!

Then for the nail art. When I make a nail art using a limited (trend) edition I always like to paint something that links to the edition itself. "Me & My Ice cream" ...do I need to explain why I chose to do an ice cream nail art?'


Monday, July 29, 2013

Day 210) Simple pink flowers nail art

Today is a very busy day.
Not much time or energy for a nail art.
Time for a simple one.

What you need:
- White nail polish
- Different pink nail polishes
- Small dottingtool

Step 1:
After the basecoat apply the white nail polish. Let it dry for a bit.

Step 2:
Work one flower at a time.
Use the small dottingtool (or toothpick) to place 5 dots in a circle.

Step 3:
Place your dottingtool in the centre of a dot and pull it towards the centre of your circle of dots.
The centre of your circle (of dots) will be the meeting point for your 5 dots.

Step 4:
Repeat step 3 and 4 for the other shades of pink.

Outcome:

Sunday, July 28, 2013

Day 209) Rainbow striping tape mani

For today a striping tape nail art.
 
Material:
-Basecoat
-White nail polish
-Striping tape
-(Tape)
-Sponge
-Rainbow colors nail polish
-Topcoat
 
Step 1:
Start with a basecoat and let it dry.
Apply the white nail polish; make sure to have good coverage.
Finish it with a topcoat and let it dry.
 
Step 2:
Use the striping horizontal and vertical to make little squares (if anyone can tell me what this kind of pattern is called in English, I would be very pleased).
Apply some regular tape around the cuticles: This way you can secure the striping tapeand you'll have less mess in the next step.
 
Step 3:
Use the sponge and your rainbow colors to sponge the colors on your taped nail.
Diagonal sponging gives a nice effect.
 
Step 4:
Remove the tape and striping tape.
Finish the nail art with a topcoat and make sure your cuticles are clean.
 
Done!


Friday, July 26, 2013

Day 207) Puzzled

It's so hot here.
And when it's hot in the Netherlands, it is really HOT!
Bubbles on my painted nails, quick drying nail polish...pfff and most of all, no inspiration.

With a puzzled mind I came up with today's nail art, it's a kind of puzzle.
I used a small dottingtool for this nail art and lots of colors.

Thursday, July 25, 2013

Day 206) Swatches and nail art Glamazona (Limited Edition Catrice)

First time shopping after the vacation.
And, with a little shame, I came home with too much nail stuff...again.
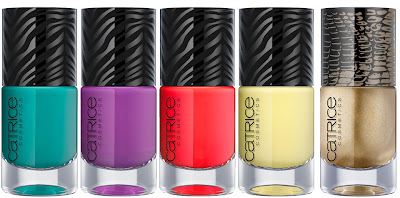
Among my purchases the new limited edition by Catrice: Glamazona.

From left to right:
- C01 Dirty Liana
- C02 I Got The Flower!
- C03 I'm A Survivor
- C04 Lime Heart Is Beating Like A Jungle Drum
- C01 Jungle Treasure (which, according to the press post should have been C01 cARMOURflage)
 
I'm on the press list, so I already knew it was coming and I've been really looking forward to this limited edition...These are just my colors! And of course I was very curious about the golden crocodile cracker.

Let's start with some swatches of the 4 colors:


The nail polish is very easy to apply and looks like a jelly. Two thin coats is enough for a good coverage. And, the colors are really beautiful (even the yellow one and I'm no fan of yellow).
This has turned out to be a very good buy...I love it!

Then the special effect topcoat: C01 Jungle Treasure (Or C01 cARMOURflage?)

Catrice says:
Crocodile Cracker
Dundee’s Manicure. Create an exciting jungle look on your nails with the Crocodile Cracker. This special-effect polish cracks open while it dries to leave behind a unique crocodile skin appearance in metallic gold on your nails. The Crocodile Cracker looks best applied on top of colour nail polish – just layer it over the dry polish.
 
Reading this I expect a croco topcoat and not a crackle one.
I applied the topcoat on top of the (dry) 4 colors.
Let's see what happened:
 
On the two left nails I've applied the topcoat vertical, on the two right nails I applied the topcoat horizontal.
I started with a thin coat, but couldn't see any croco effect. I searched the bottle for any further clues for applying and found:
"Apply a generous layer of the cracker over your favorite nail polish."
Okay...maybe it's not thick enough?! I applied a 'generous' layer of cracker on the nails and as you can see on the picture it isn't really a big difference. To me it looks like a 'plain' crackle nail polish.
The two on the right are coming closer to a croco cracker (but it's a oversized version).
 
Too bad, I was expecting more of this topcoat! For a crackle it isn't that bad I think. The gold (although it looks silver on the picture) is very pretty and it does feel like croco-skin.
But maybe 'tree bark cracker' would have been a better name!
 
Now, let's get to the nail art.
I wanted to use the 4 colors and chose to paint something suitable for these colors and the name of this limited edition: Glamazona.
 

100 Followers surprise give-away!


Dear followers,
 
I've reached the 100...YES!!!
I have to say you're the sweetest for reading my blog, giving it +1's, sharing and most of all commenting.
Without you it wouldn't be any fun...So, thank you from my heart!!!
 
Of course I want to show my appreciation with a surprise give-away upon my followers.
 
So, leave a comment below this post with  a Nail polish or Nail art product which is high (highest) on your wishlist.
 
You'll all have a chance to win your #1 wishlist thing. On July 31st I will announce the winner.
 
 
N.B. I'm from the Netherlands. Some brands of Nail polish or Nail art products aren't available here. But maybe it's a nice opportunity for that one thing you can't get at your country....


So, thanks again and please leave a comment!

Wednesday, July 24, 2013

Day 205) Black & white abstract nail art

No inspiration!
In my case this often means I end up with an abstract or flower nail art :-/

I'm glad I took some pictures in the middle of the process, because after the picture (of today's nail art), I tried to color the white lines in and it turned out very ugly.

However, here is today's nail art:

Tuesday, July 23, 2013

Day 204) Nail art Royal baby

I too want to congratulate the Royal Family of England with the birth of the Royal baby boy.
All the best wishes!

And of course a nail art....

As inspiration for this nail art I used the following image:

Karl Lagerfeld - Sketch of a gift idea for the Royal baby


Monday, July 22, 2013

Day 203) Classy rock nails

I've been asked to do a nail art with spikes.
It's not really my thing, but I like to answer to any requests.
I've searched the Internet for some cheap spikes, but in the Netherlands I could only find one site providing them and they were too expensive in my opinion.
I decided that (until they become cheaper) I would use a cheaper version; the stud version of spikes.
They are a little bigger than the Nail version, but they just have to do.

Here is my classy rock nail art (with spike ;-D )

Sunday, July 21, 2013

Day 202) Stamping nail art using real leaves

Every now and then, when I was sitting in the back yard, my thoughts drifted away to making a stamping nail art using real leaves.
Wouldn't it be pretty to copy the leaf nervures onto your nail without the work of painting them?!
Today I finally tried.

I used the two best leaves I could find in my garden:
1) Small fern
2) Grape leaf

Start with painting your nails in any desired color:

Essence Floral Grunge nail polish - 03 Grunge me tender!

Take any other desired color and polish the leaves:


Use the polished side to stamp it on your nail; place the leaf carefully on your nail and give it a gentle push. Change colors and stamp again.
Not sure about the outcome? Start by stamping on a paper.


Saturday, July 20, 2013

Day 201) Nail art zigzag (needle dragging)

After a good flight and a two hour drive we were finally home at 5 A.M.
I'm exhausted, so for today a quick one.

For this nail art I used the needle dragging technique.
1. Paint your nails with any desired nail polish (don't wait for it to dry)
2. Take any other color and drop some dots of polish on the nail
3. Take your needle and place it in the centre of the first drop. Drag it to the next one. Lift your needle and place it in the centre of your second and drag (etc.)

Friday, July 19, 2013

Day 200) Beach nail art (perfect vacation nails)

Today is my last post from beautiful Portugal.
Not only is this my last vacation post, it's also day 200!
I think this nail art is a great way for ending this vacation.

For today's nail art I used sand and seashells I found at the beach!!

Tuesday, July 16, 2013

Day 197) Lanscape nail art

Since I'm enjoying my holidays here in Portugal, I've totally fallen in love with tropical landscapes and other vacation scenes.
Today another landscape, this time using beads for accents.

Sunday, July 14, 2013

Day 195) Marble art (Sephora)

Thanks to Teresa Gardner and her lovely blogpost (which you can find here: boomernails) I've been looking for OPI's black spotted everywhere.
Haven't found it yet, but I did find Sephora's Marble Art topcoat, which claims to do the same thing.
For the price of 5,14 USD I thought I give it a try.

As base for my nail art I used two polishes also purchased at Sephora:
Left: Sephora - 84 Full moon party
Right: Sephora - 72 Tomorrow, detox!
 
Both nail polishes have a simularity with metallic polishes.
The left one can be described as a dark purple with multicolor glitter.
The right one is a petrol color with silver glitter.
 
I started with two coats of the purple polish and then placed some randomly areas of the petrol color.
 
After this simple base let's get to the most important part of this post:
Sephora - 07 Marble Art
 
The topcoat itself has some simularity to watercolor paint.
I applied a very thin coat of this topcoat (too thick will just make a black nail).
It immediately starts to make holes in it. No perfect dots, but more random shapes, revealing the underlaying surface of petrol and purple.
I haven't used a topcoat, but if you're satisfied with the outcome, I think you should.
If you wait some time before applying a topcoat, some more marble art topcoat will be gone revealing more of your base color.
I think the nail art looks better the next day (revealing more of your base), but it all depends on your own desires and also your underlaying colors I think.
 
I'm very happy with the two topcoats I bought at Sephora (also see previous blogpost about Sephora's Tie Dye topcoat).
They've turned out better than expected!!
 

Saturday, July 13, 2013

Day 194) Nail art Tie Dye (Sephora)

I've had a great weekend at Lisbon!
Bought some nail products, made my nail arts, but no working Wifi :-(
I'll try to get op to date as soon as possible.

I found a Sephora store in Lisbon and my hubby actually had to drag me out of there.
Í had never been in one before (shame on me) and it took me almost an hour to just look at all the nail products.
I guess my hubby didn't want to see how long it would take me to see everything ;-D
Thank god I could limit my buying by looking at the price. Everything over 10 USD I didn't want to buy.
I left the store with two nail polishes, two special topcoats and a remover. With a total under 20 USD.

For today's nail art I used one of the special topcoats: the Tie Dye.

But first things first, the base color:
Leticia Well - 444 (purple)
 
2 Coats of Leticia Well - 444 (purple)
 
Then I used the Tie Dye topcoat of Sephora:
Sephora - 05 Tie Dye
 
Because I didn't want the risk of redoing my nail art, I took it save and applied the tie dye topcoat in a way I could be sure it worked.
I applied the first coat of tie dye topcoat a little under my top cuticle. The second coat a little under the first coat and so on.
Sephora - 05 Tie Dye
 
An ombre is also easy to do. Give your nails the base color. First nail one coat of tie dye, second nail two coats of tie dye and so on.
Another thing I want to try is using the topcoat in one smooth motion to see if it will make a smooth gradient. I'm not sure if it will...but when I try, I'll share my experience with you.
 
But my experience so far is a good one:
-Nice price (5,15 USD)
-Easy to apply
-Great outcome!
 
For sure a topcoat I can recommend!


Friday, July 12, 2013

Day 193) Nail art glitter flower

In a few hours my hubby and I are off for some sightseeing.
My parents will take care of the kids as we go to Lisbon for at least one night.
So, today is a fast nail art because I just want to enjoy Lisbon and my sweetheart.

After the basecoat I sponged some pink, purple and gold nail polish. Then I used my striper brush and a black nail polish to roughly paint the contours of the flower. I ended with (roughly) coloring in this flower with a glitter polish.

Thursday, July 11, 2013

Day 192) Nail art olive branch

Portugal has many olive trees.
Each year my parents help harvesting.
As appreciation for their help they get a lot of olive oil.
And when my parents visit us, some of it will end up at my kitchen.
I love olive oil and it's quite expensive in The Netherlands, so it is welcomed with open arms.

Today another Portugal nail art; an olive branch


Wednesday, July 10, 2013

Day 191) Nail art cat eye marble

It's just no fun working with nail polish with this kind of temperatures.
Before my brush even touches my nail, the polish on the brush has dried out.
Therefore my nail arts require the more watery polishes; for example the neons.
Today another neon nail art, this time inspired by a cat eye marble of the children.


Tuesday, July 9, 2013

Day 190) Nail art holo glitter with flower stamp

Last week I bought a nail polish here in Portugal that I have to share with you lovely ladies, because it's just that beautiful!
I bought it at the Douglas store (perfumery) for €2,- (which is 2,57 USD).
It's a kind of holo glitter.
In the dark it might look like a plain grey but when you're in direct (sun)light it will take your breath away!
Here is my best picture at night:
Flormar Supershine Perfect Polish - P046 (2 coats)

Can you see what I'm raving about???!!!

Today has been a day of shopping and going out for dinner.
It is almost midnight so I want to do an easy nail art.
Luckily I found a stamping set here for €8,99 (11,56 USD).


Kand stamping kit
This kit contains:
-Stamping polish (black, white and red)
-Image plates
-Scraper
-Remover pads
-Stamp
-Stamp with scraper
-Remover pen

I used the following image plate:
Kand image plate M38
 

The exotic flower (the one with the scratches), is the image I used.
The picture isn't doing the polish any justice, but believe me when I say: It is beautiful!!