Showing posts with label blue. Show all posts

Tuesday, November 18, 2014

Movember nail art

 Yes, it's Movember.
Movember is an annual event involving the growing of moustaches during the month of November to raise awareness of men's health issues.
The goal of Movember is to change the face of men's health.
I can't grow a moustache (duh), but I can make a nail art for support.

Luckily for me, Movember is also the challenge over at Nail Polish Queens (NPQ) community.
If you have time...join us at NPQ and support Movember.

I'm sooooooo short on time lately, so this is a quickie.

Base color is: Kiko (Sun Show nail lacquer) 475
Moustache is created with loose gold holographic glitter.


Friday, May 23, 2014

World Turtle Day

Are you familiar with Nailpolis: Museum of Nail Art?
It's a place where all nail fanatics post their swatches and nail arts.
Besides this museum part they also host challenges and contests with prizes (internationally)!
This time the challenge was an event: World Turtle Day which is today May 23rd.
 
This is my entry:
 
 
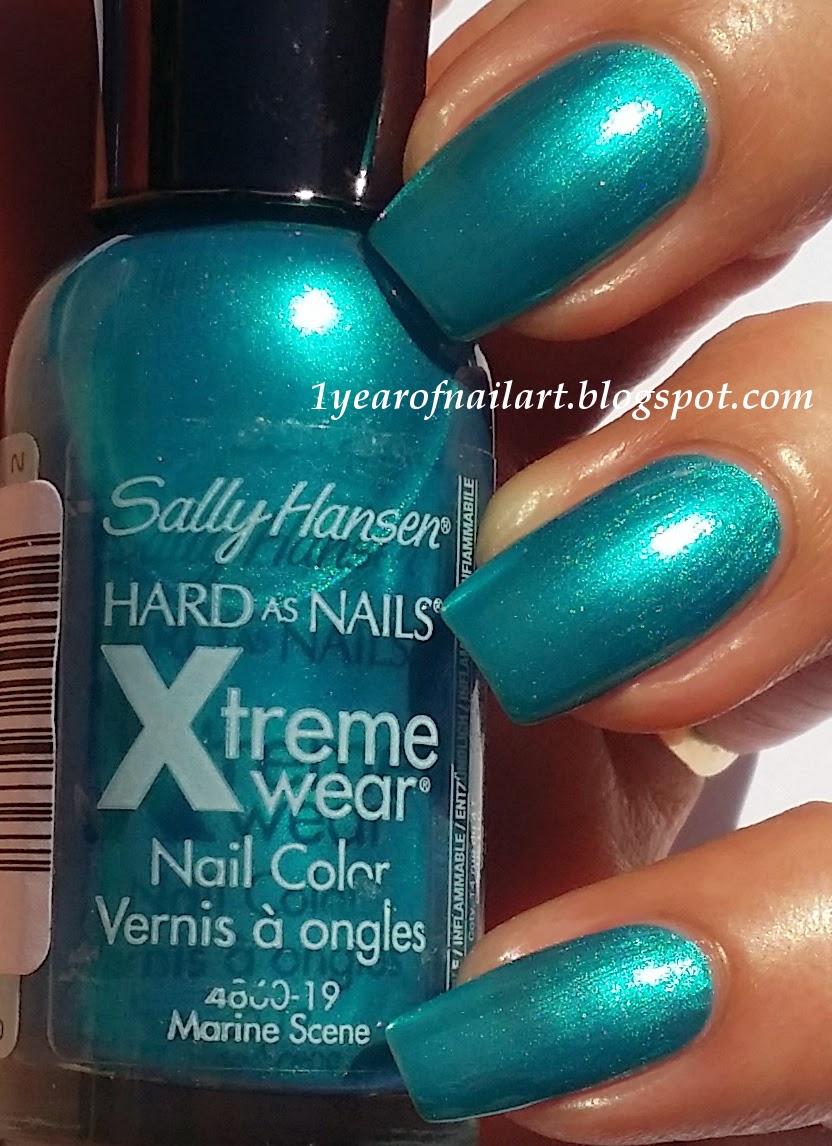
I started with applying Sally Hansen Marine Scene.
Then I took acrylic white paint to make the waterlines and added another coat of Marine Scene to make them less visible and therefore more natural looking.
With a detail brush and acrylic paints I painted the turtle.
 
Here is a swatch of Sally Hansen 280 Marine Scene:


Saturday, May 3, 2014

Matte mix and match nails (blue, silver & white)

What I love about art in general is that you can get your inspiration everywhere.
Therfore my computer is like a huge Pinterest board.
Everytime I see an image that I like I save it somewhere on my computer and once in a while when I'm out of inspiration...I go through them and find something that I want to translate to my nail art.
I don't consider this stealing or copying but I do think it's decent to mention the source...
and that's where I fail.
I save the images as fast as I can using numbers or a letter and when I finally come to use them I don't even remember where I got it from.
So...I can only show you the images but sadly without a source.
Now, if you happen to be the owner of one of these images.
Consider my publication as a compliment.
You can always ask me to remove the image are mention your source/URL and I be happy to publish it :D
 
Here are today's inspirations:


I'm really in love with the jewelry above.
I love the ring and the bracelets and I love the combination of dark blue & silver (& white).
 
Here is my nail art:
 
 
Polishes used:
- Only You White French
- Maybelline 650 Midnight Blue
- Layla Mirror Effect Nail Polish 01 Metal Chrome
- China Glaze Matte Magic
 

Saturday, April 12, 2014

Splatter nails

Today I have some blue and white splatter nails for you.
I made these with the purpose to matte them for the NPQ challenge.
I'll show you the shiny and matte version and have to say: the matte is the best!


 Polishes used:
- China Glaze 818 Snow
- Max factor 37 Prussian Blue
- China Glaze Matte Magic

The splatters are made by dipping a cut drinking straw in the polish and giving it a short, full blow.
Repeating the process when I wasn't satisfied yet.
 

Friday, April 11, 2014

Blue nails with hearts accent

I'm having such an off-day.
I think I did about 15 designs today but it just didn't work for me.
I had no inspiration...and was even a bit done with the blues.
 
But whilst I was making dinner I suddenly remembered this picture I saved with hearts and I just went for it.
 
 
Polishes used:
- Maybelline Color Show Brocades 222 Beaming Blue (nails and 4th heart at the bottom)
- H&M Nail Polish Blue (accent background)
- L'Oréal Color Riche 624 Island in the sun (1st heart from the top)
- Big City Nails Are you feeling blue? (2nd heart)
- Big City Nails The sky is the limit (3rd heart)
- Maybelline Color Show 661 Ocean blue (outline hearts)


Thursday, April 10, 2014

Disney Frozen Olaf nail art

Today I have another beautiful polish from Big City Nails
This one is called: Are you feeling blue?
 
Let's start with some swatches:
 
Picture taken with natural light.
 
Picture taken with artificial light
 
Are you feeling blue? is a beautiful shimmery blue polish with green undertones making it lean towards teal.
This duochrome polish has a satin finish.
I used two coats in the pictures above. First coat was quite streaky and didn't went on smooth.
Surprisingly the second coat made it opaque and a lot less streaky. Nothing a topcoat can't solve.
Pictures above are without topcoat.
Two out of three polishes are gorgeous...can't wait to try the last one...but that one has to wait till after my Autism challenge.
 
Now, for the nail art.
 I've been asked many times to make Frozen themed nails.
I actually bought the movie for my kids and they love it (and mommy too!).
However it's not really the time of year anymore to make nail arts with snow, frost and ice.
But I make an exception with this polish and this challenge.
 
Are you feeling blue?
Olaf will make you smile!


Wednesday, April 9, 2014

Puzzle nails

Puzzle pieces are the international symbol for Autism.
The puzzle piece logo was first created in 1963 by the National Autistic Society.
They explain that the symbol of the Society should be the puzzle as this did not look like any other commercial or charitable one as far as they could discover.
Nowadays the puzzle piece has much more meaning and better ones too.
I could make a list with meanings but I guess you're here for the nail art right?
Let's end with the fact that Autism is a puzzling condition.
 
Here is my nail art:
 
 
I actually did a sandwich nail art.
As layers I used a local brand polish; Etos - Mint Cupcake (which is lighter blue in real life than in the picture).
The polish is a milky blue crelly filled with small blue hexes, medium sized pink and silver hexes and iridescent bar glitters.
The above description promises a beautiful mixture...however I hated the substance.
Now, up front I don't have much experience with polishes like this, but OMG is it normal that it feels like painting glue with glitters on your nails?
Even painting a single thin coat was a quest on it's own. Whilst painting I could have done sugerspun nails with the strings of polish between my nails and brush!
Thank God for the topcoat as I applied it on the still wet polish to even everything out.
Between the layers of polish I've painted puzzlepieces using a detail brush and stamping polish; Essence Love Letters 05 Inkheart
 
Despite the troubles I had I am happy with the outcome.
 

Tuesday, April 8, 2014

Street style Autism nails (graffiti)

Today's Autism nails for #paintitblue is a graffiti nail art.
I love graffiti!
 
Hope you like my nail art!
 
 
Polishes used:
- Bourjois 26 Blue no blues (background)
- Maybelline Color Show Street Artist top coat 04 Alley Attitude (background)
- Bourjois 06 Adora-bleu (letters)
- Rimmel 840 Blue Eyed Girl (outline letters)
- China Glaze 544 Liquid Leather (shading letters)
 

Monday, April 7, 2014

Blue holo flower nail art

I actually didn't want to do a nail art today.
For two reasons:
1) I'm not feeling very well :(
2) This polish doesn't need anything
 
Let's start with the polish.
This is my first Indie polish and it is from the Netherlands...yay!
Thanks to another blog...don't know the name anymore because I was on a huge Google/blog search for Dutch Indies :-/
I finally found Big City Nails
And ordered 3 beautiful polishes.
 
Today I show you "The sky is the limit"
 
 
Are you seeing the gorgeous holo glitter already?!
 
 
I love the bottle top. It's like a giant "The sky is the limit" gemstone.
In fact every nail polish bottle should contain this...don't you agree?
 
 
The hand written polish name...definitely Indie and personal :D
Oah and a little peek of the polish on the nails.
 
Here are some more swatches:

This picture is taken in the shade

 
This picture is taken in sunlight (but we didn't have much today).
 
The sky is the limit is a clear polish filled with a great amount of blue and holo glitters.
Pictures above are 3 coats and 1 coat of Seche Vite topcoat.
With the first coat I wasn't sure if I could get this polish opaque but it built up very quickly with the next coats and also dried a lot faster than other glitter polishes.
There wasn't much sunlight today but when this polish hits the light...ahum...breathtaking.
I bought it for €6,95 ($9,54)
For sure a polish and webshop I can recommend.
 
For the nail art I only did a simple flower on the accent nail.
 
 
Polishes used:
- Big City Nails - The sky is the limit
- Layla Holgram Effect 07 Ocean Rush
- Maybelline Color Show 661 Ocean Blue
- China Glaze 544 Liquid Leather
 

Sunday, April 6, 2014

Blue and gold dragon nails

A dragon eye nail art was still on my "to-do-list".
And today I finally found the right spirit to do so.
I'm still in the #paintitblue challenge so of course it had to include some blue :D
 
The dragon eye nail art is a free hand design using different polishes.
The other nails have a 'bad' croco topper which I reviewed some time ago and can be found here.
 
 
Polishes used:
- Essence Effect Nail Polish (Jeans Sugar) 07 Blue-jeaned
- Catrice Limited Edition Glamazona (Crocodile Cracker) C01 Jungle Treasure
- Maybelline Forever Strong Pro 820 Winner takes it all!
- China Glaze 553 Sexy in the city
- China Glaze 554 Liquid Leather
- China Glaze 818 Snow
 

Thursday, April 3, 2014

Blue water marble nails for Autism

In my last give-away I've asked people what they wanted to see in my next nail arts.
I found this very useful as it not only gives me ideas for next art but also what people want to see.
 
A few times they asked for a water marble.
 
To be honest:
I love the look of water marble nails!
 
But I hate the frustrations that it is giving me.
First 'the polishes'; not all of them work well for water marbling.
Second 'the design'; it almost never ever ends up the way I had in mind.
Third 'the outcome'; mysterious appeared bubbles, open spaces, awful design.
And last but not least 'the clean-up'; and this is with tape!
 
So, today's autism mani is quite perfect IMAO ;D
But it took me 2 hours of redoing which is more than a detailed mani will take...


For these nails I've used 2 polishes:


Tuesday, August 13, 2013

Day 225) Nail art abstract blue

For today I have another step-by-step nail art.
The technique used I've shown before (you can find it here)
But today I wanted to see if it could also bring some other ways of use.

Step 1: Start with a white base

OPI - Alpine Snow
 
Step 2: Preparations for the nail art

1) Material:
 
- Seche Vite topcoat (or any other topcoat)
- Sealable plastic bag/zipper bag
 
2) Make some sort of swatches with the topcoat on the bag and let it dry:
 

3) Give the topcoat swatches different blue colors and let it dry:


Step 3: Making the nail art

1) Material:
 
- Scissors
- Tweezers

2) Carefully pull the topcoat with color from the bag. Hold it with the tweezers as you cut it in any desired design. I chose to cut some stripes, triangles, triangular shapes and random little shapes:
 

3) Apply topcoat on the white base and use this as glue for your shapes. To easily remove any excess apply another layer of topcoat as the shapes will blend in it. (The rest can be removed with remover.)

And this is the outcome:

The first three designs (from left to right) aren't that special I think.
This can also be done hand painted and for me it would take less time.
But if you aren't that steady yet, this could be the perfect solution.
The last design I really love. I can't even describe it but Í'll give it a try: broken glass, crushed ice, stars...It is different!


Wednesday, June 5, 2013

Day 156) Nail art blue stripes (abstract)

Today's nail art is a custom one.
It's for a drug store called Etos.
Besides the make-up from the more commercial brands (Like L' Oréal, Bourjois, Rimmel, Max Factor), they also sell their house brand.
Etos also has a company slogan which is: Etos blue fits you!
And of course their colour is blue.

For today's nail art I used 4 nail polishes from their house brand and made a design which looks a little like a barcode.

Material:

- Dark blue nail polish (metallic); Etos Quick dry nail polish
- Jeans blue nail polish; Etos Long lasting nail polish
- Light blue nail polish; Etos Quick dry nail polish
- Blue glitter topcoat; Etos TOP coat
- White nail polish; Only you
- Striper brush
- Striping tape
- Scissors
- (Regular tape)

Step 1:
After the basecoat paint your nails white.
Step 2:
Use the regular tape or striping tape to tape off the sides of your nails. Leaving a stripe in the middle.
Step 3:
Use the striping tape to divide the middle (vertical) stripe into (horizontal) stripes. Vary the space between the striping tape.
Step 4:
Use the striper brush to colour in the stripes. For the bigger spaces I used the dark blue, for the middle I used the jeans colour and foor the smallest I used the light blue.
Step 5:
Remove the (striping) tape
Step 6:
On the ring finger I did an accent using the glitter topcoat. I kept the middle stripe smaller on this nail. Then I used the striping tape again, but to leave space on the sides of the nail. On the sides I applied the glitter topcoat
Step 7:
Apply topcoat. Done!
Applying the striping tape is the most time consuming. I would suggest to do this striping design only as an accent nail.
How about it?
Does Etos blue fit you?!

Thursday, May 2, 2013

Day 122) Water spotted nail art with perfume

I came along this nail art and I just have to share it with everybody!
It's easy and it looks fantastic!

I saw some YouTube tutorials about it and I've seen people doing it with hairspray and sanitizer spray. I tried both but it didn't work for me. It either made too big spots or it clotted together as a sticky black mess.
After several times of trying my eye catched a perfume sample and I thought: "Let's give it a try maybe that will work". And it works!!!

Materials:
- Bright colors nail polish (at least 3)
- Black nail polish
- (Tape)
- A cup or something which you can use for water marbling
- Perfume (perfect way for using the samples or perfume you didn't like or use the one owned by
  your signifant other ;-D )
- Nail polish remover

Step-by-step:

1) Paint your nails with the bright colors.


I used pink, yellow, blue and orange to devide the nail in 4 parts and then added some purple.
I did use a topcoat (for the picture) but I don't think this is necessary yet.
If your cuticles are a mess right now don't clean up you'll have to do that later on anyway.
Let the nail polish dry.

2) Use the tape on your fingers if you want to decrease the cleaning later on.

3) Fill your cup with slightly warm water from the tap.


4) Drop the black nail polish on the surface of the water: 3 or 4 drops should be enough.


The nail polish has to spread on the surface. If it doesn't you either have to adjust the temperature of the water or get a newer polish.

5) Spray your perfume on the surface of the water. Start a little high with spraying and wait a few
     seconds to see if there is a reaction.
    If not. Get a little closer and try again. A max of two sprays should be enough for a nice spotted
    design.


6) Choose the spotted area you like and dip your nail on it (flat)
    Then move the finger slowly forwards in the water.
    Use a toothpick or something to remove the excess polish from te water (around your finger).
    And carefully lift your finger out of the water.

After each nail dip there will still be some perfume left on the surface of the water. Therefore I recommend that you clean your cup after each nail dip. You don't want the reaction with the black nail polish as soon as you drop it on te water but after spraying.
By cleaning I mean putting the cup under the running tap for a few seconds.

If you finished all your nails this will be the look you'll have:


Note: When you spray once you'll have smaller dots but I wanted the bright colors to have the lead not the black.

7) Remove the tape and clean your skin and cuticles with the remover.
    Wait for the nail polish to dry and finish it with a topcoat.
    DONE!


I love it! These are hot summer nails

Let me know if you ever tried it or going to try this.
What did you use?
Did it came out the way you wanted?

Monday, April 29, 2013

Day 119) Nail art Queensday

Tomorrow is the abdication of our Queen Beatrix and the investiture of Prince Willem-Alexander.
A day in history for our small country The Netherlands.

Of course I have to do a nail art about this:


On the left you see a homemade waterdecal of our Queen Beatrix en on the right is our new King Willem-Alexander.
The rest is hand painted.

Saturday, April 27, 2013

Day 117) Kingsday nail art

Today is Kingsday in the Netherlands.
Not official yet because the crowning is on Tuesday when it's Queensday.
It's been a while since we had a king so everybody is very excited and already celebrating this day.

For this day I have to do some national nail art.
Less interesting for you guys....??
No! You can still use the designs in different colours or make your own national nail art with it.


 These colours are my base for the nail arts.
N.B. Our flag contains red, white and blue and the colour we use at special events like the Olympics, Queensday is orange.

1)


I started with some randomly placed red dots. For this I used a dottingtool. After the reds I did some orange dots and finished it with some blue dots. Outcome: Dutch confetti

2)


First I made a gradual design with white on the middle of the nail.
I do this because my red and blue aren't good for 1 coat. At least not when they are applied on darker colours like the orange.
The first step gets a red colour. The second a white and the third a blue colour. I like to give my designs some golden accents because of the king/queen. But it also gives the opportunity to disguise some failures.

3)


Start by making a crown.
Make two ribbons underneath the crown.
Give the ribbons the colours of your flag.
I detailed the nail art by giving the crown some gold (bottom) and gold glitters (outlines).

4)

For this design I simply used the same technique as you would do to make a tigerprint.
Place stripes alternately. Starting thicker on the outside and thinner at the inside.

5)


Start by making some balloons.
Then give the tip of the nail your flag colours by using something simple to apply (beads/billions/caviar, velvet or in this case glitters).
Use a brush to paint one stripe of clear coat on the desired place. Glitter it. Then apply the second stripe of clear coat and glitter it. Do the same for the last colour.

Total look for Kingsday