Showing posts with label texture. Show all posts

Sunday, May 25, 2014

Golden holo nails with 3D nail art

Today I have another Herôme polish that I want to show you.
Another holographic one to be more precise.
 
It's part of the W.I.C. (World Inspired Colors) line.
W.I.C. by Herôme is inspired by the richness of different cultures and every nail polish is named after a world city.
The polishes are oxygen permeable and enriched with Silica and Vitamin E for optimal care and brilliant shine.
 
Let's start with some swatches of W.I.C. by Herôme 73 Kingston:
 
 
Picture above is taken in the shade to show you the color without direct lighting.
It's quite dull but still a very pretty champagne like color that will match many outfits.
 
But will there be holo in direct lighting?
The following pictures are taken in the sun:


The polish is very rich pigmented and takes only 2 thin coats to be opaque.
Application was very easy and no dragging.
The color shifts in different lighting from beige/brown, champagne to gold.
The holo effect is scattered with a subtle prism.
The prism is more strong in real life though but not as strong as some other holo polishes.
 
Here is a macro shot of the polish:
 
 
I'm in love with this polish.
I'm more a fan of the holo's with strong prisms but this one would be a perfect nude holo.
Gorgeous for events when you need something subtle but still want to stand out with your nails.
 
For the nail art I chose for something bold.
As a contrast to the subtle and classic polish.
Something with more texture and 3D effect.
I've used the following polishes for this nail art:
- W.I.C. by Herôme 73 Kingston
- Maybelline 820 Winner takes it all!
- Classics Metallic 03
- Essence Metal Glam 01 Steel-ing the scene
 
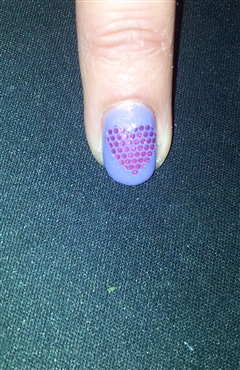
I wanted to create some kind of circular gradient.
I started with the darkest color: Steel-ing the scene and used  a bigger dottingtool to place the polish at the outer side of the nail.
I dabbed as many times with the dottingtool and polish till I was satisfied with the texture.
I then worked my way in with the same techique and the lighter colors.
 
I'm not sure if my explanation is clear but if many of you want a tutorial for it...I'll make it.


Monday, June 17, 2013

Day 168) Nail art with colored sand

Nails with texture are hot.
There are nail polishes that contain texture within themselves, for example Liquid Sand by OPI
But there are also brands like PUPA which have a nail art kit for texture; Pupa - Crazy Crystals.
This kit contains:
- Lasting color nail polish
- Crazy Crystals
- Mini brush
- Tray
Both the textured nail polish and the texture kit are rather expensive.
At least too expensive for me...for I only use it ones or twice.
I like to think outside the box and look for cheaper alternatives.
And...I think I've found it!

At the local drug store, but I think you have better luck at a craft or toy store, I found this kit:
Grafix - Sand Bracelets


This kit contains:
- Plastic bracelets which can be filled
- Colored sand
- Mini funnel
 

Of course I'm not interested in the bracelets, but I do have interest in the colored sand. Especially for the price of €1,49 (1,99 USD).

For today's nail art I've used the colored sand from this bracelet kit.
I only did two nails, for I don't like the removing of this textured nails (and my middle finger nail broke aaarggggghhhhh).
The other nails I painted purple; Essence Colour & Go - Oh my glitter!

The sand nail art is pretty simple too.
I used a striper brush and basecoat to make stripes on the nails (one by one and alternately starting from different sides of the nail, like a tigerprint).
Then I applied the sand, shaked some excess off and gave it a blow.
...Next stripe, sand, shake it off, blow...
...Next...and so on
The colors are bright and you can see the sand texture very well. Of course this is easily damaged because of the texture. So, if you want it to last, you'll have to apply a topcoat:
The sand texture is less visible and the colors are less bright, but it does look more like the liquid sand nail polishes.
To give it a little extra, I added some tiger stripes to the sand nails. I used a black striper for this:

I'm very pleased with this sand. I think it's a great, cheap alternative to the more expensive liquid sand and textured kits!

Saturday, May 18, 2013

Day 138) Nail art with Max & More Nail stickers

I'm not a big fan of nail stickers.
My nails are pretty round and nail stickers are flat which in most cases means that they don't fit very well.
But I only had 15 minutes for today's nail art so nail stickers are the easiest thing.
I do have a way of using them without the worry of fitting and the outcome is even better than using them in the way that you are supposed to use them (in my opinion).

The nail stickers of today are from the brand Max & More which is the house brand of the Action store (a discount store).


The package contains 14 pieces and 7 different nail sizes.
It's a transparent sticker with shiny gradient dots on it. The stickers aren't smooth but do have some texture on it - a little like snakeskin.

In today's nail art I want to show you how you can take advantage of the transparency and texture of these nailstickers.

Thumb:


Pink nail polish as background.
Cut nail sticker.


Index finger:


Silver glitter nail polish as background.
Cut nail sticker.


Middle finger:


Purple nail polish as background.
Cut nail sticker into heart shape.


On the nails I used nail polish colors simular to the ones on the nailstickers.

Ring finger:

On the ring finger I used the nailsticker the way you're supposed to. The arrows indicate where the gabs are. After trying really hard, this was the best outcome with only two gabs. One nail - no problem! Ten nails - Arggg!

Pinky:
On the pinky I used the texture in my advantage. I cut a piece of nail sticker and placed it on the nail. Then I painted one coat of a pink nail polish (I chose a nail polish which only needs one coat for good covering). The picture doesn't show that well but in real life you still have a little colour changing on there and the texture gives it a really snakeskin look.

And this is the total look:
Nail art nail stickers

I think they turned out great in less than 15 minutes!
Time for a night out!