Showing posts with label holo. Show all posts

Wednesday, November 26, 2014

Winter look (nails+face)

I really enjoy making those total looks.
But man, the trouble to get there :D

First the nails...
I broke 3 nails down to pity size and just couldn't get used to those tiny, sad looking nails.
Picture will show acrylic nails that I did myself.
For the nail art I started with a gradient of holo's:
* A england - Tristam
* Layla - Ocean Rush
* KOH - Platinum Silver!
Which I stamped with white snowflakes.


Then the make-up...
Yesterday I've created a look that took me about 2 hours.
Too late to take pictures cause I really needed to get the kids from school.
I've made a total fool of myself by showing up at school with the make-up on (although the kids thought I was part of a Disney's Frozen play).
Rushed home, took 125 pictures and decided NOT ONE was good enough :-/
Today I've been having more luck and I'm actually very, very pleased with how it turned out :D

Hope you like it too!


Tuesday, November 11, 2014

Swatches Catrice Million Styles Effect Top Coat & multichrome rhinestones by Born Pretty Store

Catrice recently came out with a new series of Million Styles Effect Top Coats.


The effect top coats all have a clear base filled with colored glass flecks.

From left to right:
01 Godfather of Pearl 
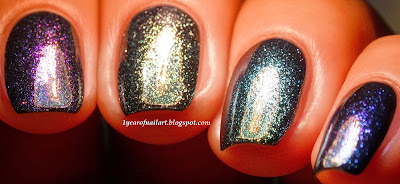
Godfather of Pearl is a mix of purple and pink glass flecks. 
Although the pink glass flecks are visible, main color is purple.
02 ¿Holo, Que Tal?
¿Holo, Que Tal? is a mix of yellow and orange/pink glass flecks. This is the only one from this collection that has a very visible duchrome shift in any light source.
03 Have an Ice Day
Have an Ice Day is a mix of yellow/green glass flecks. Main color is a bit more green than the yellow color from ¿Holo, Que Tal?
04 Return of Space Cowboys
Return of Space Cowboys is a mix of blue and blurpe glass flecks. Main color is blue.


Of course these effect top coats can be applied over any color nail polish and/or on the natural nails.
I however, prefer lacquers like these applied over black.

'Single nail' swatches show 1 coat of effect top coats applied over 2 coats of China Glaze Liquid Leather (black).
I have a glossy and a matte version for you.

Swatches glossy

Picture taken in light box without flash

Picture taken in light box with flash

Swatches matte

Picture taken in light box without flash

Picture taken in light box with flash

Review 

I can be short.
If you love glass fleck lacquers, these are wonderful for you.
Only note I can give is that they apply like a jelly (a bit syrupy, but workable).
I can imagine this will be harder to apply over time, as it will probably get more and more thick.

Nail art

Today's nail arts feature another product that I received from Born Pretty Store.


Nail art wheel containing 200 pieces of heart, circle and marquise multichrome rhinestone nail decorations.

Of course I could go for a plain look by placing these rhinestones on top of my swatches but that wouldn't be me, as I like to add some personal touch.

I thought of another nail art design that I was still dying to try out.
I wanted to do some sugar spun black strings topped with different colors of metallic transfer foils.
And this was the result:


I have to say that the total look was stunning but perhaps a little too much????

So I've made another design but this time a bit more calm...or so I thought :D
Making silver holo area's in which I placed the rhinestones.


If you want to order some goodies from Born Pretty Store.
You can use my code to get 10% off of your order:
HUB10

Wednesday, September 10, 2014

Lace nails

It's been such a long time since my last entry for the weekly challenge over at Nail Polish Queens (NPQ) community.
Which is actually sad because I really like those weekly challenges and the community!

This week the challenge is: Lace
Although I consider myself more of a free hand painter, lace is a thing that looks just weird when I'm doing it free hand.
And, let's be honest, the lace patterns on stamps and decals are out of this world!

Today I bring you another nail art with the use of water decals.
And again, these came from Born Pretty Store.

Let's have a look at them :D


As you can see there are black and white lace patterns and I immediately had to think about a wedding themed nail art.

As a base for my nail art I've used this gorgeous polish by Dance Legend.
Anna Gorelova by Dance Legend 03 Gold Fish
Gold Fish is a sheer platinum gold filled with larger scattered holo particles that look like white gold particles without direct lighting,
A polish really suited for wedding nails.
However, when I started applying this polish it was kind of sheer. It did build up but it took me about 5 coats to have it as I please.
Application was really easy and I was able to apply the other coats very soon after the previous.
But...I smudged a nail right after finishing application and had to start all over again.
I decided to make it more easy for myself by using a 1 coater platinum gold as base for the Gold Fish...leading it to be used more as a topcoat.
The color underneath Gold Fish is:
Maybelline Forever Strong Pro 820 Winner takes it all!

I cut the water decals so I could make a V-shape (Chevron).


I'm really pleased with the elegance.
What do you think?


Wednesday, September 3, 2014

Born Pretty Store Prize and Glam Polish swatch

Today I bring you a gorgeous polish by Glam Polish.
Glam Polish is an Australian Indie brand.
All Glam Polishes are 3-free and cruelty free.
They only ship to the USA and Australia but there are some international stockists that ship worldwide.

I also won a Born Pretty Store prize a while ago and recently I received it.
The prize: water decals (chosen by me) and some random products (extra gift from BPS).
Now, I'm not going to show you all the items yet because more blogposts are coming ;-)
Want to purchase anything yourself? You can use my 10% off code: HUB10

Let's start with the polish.

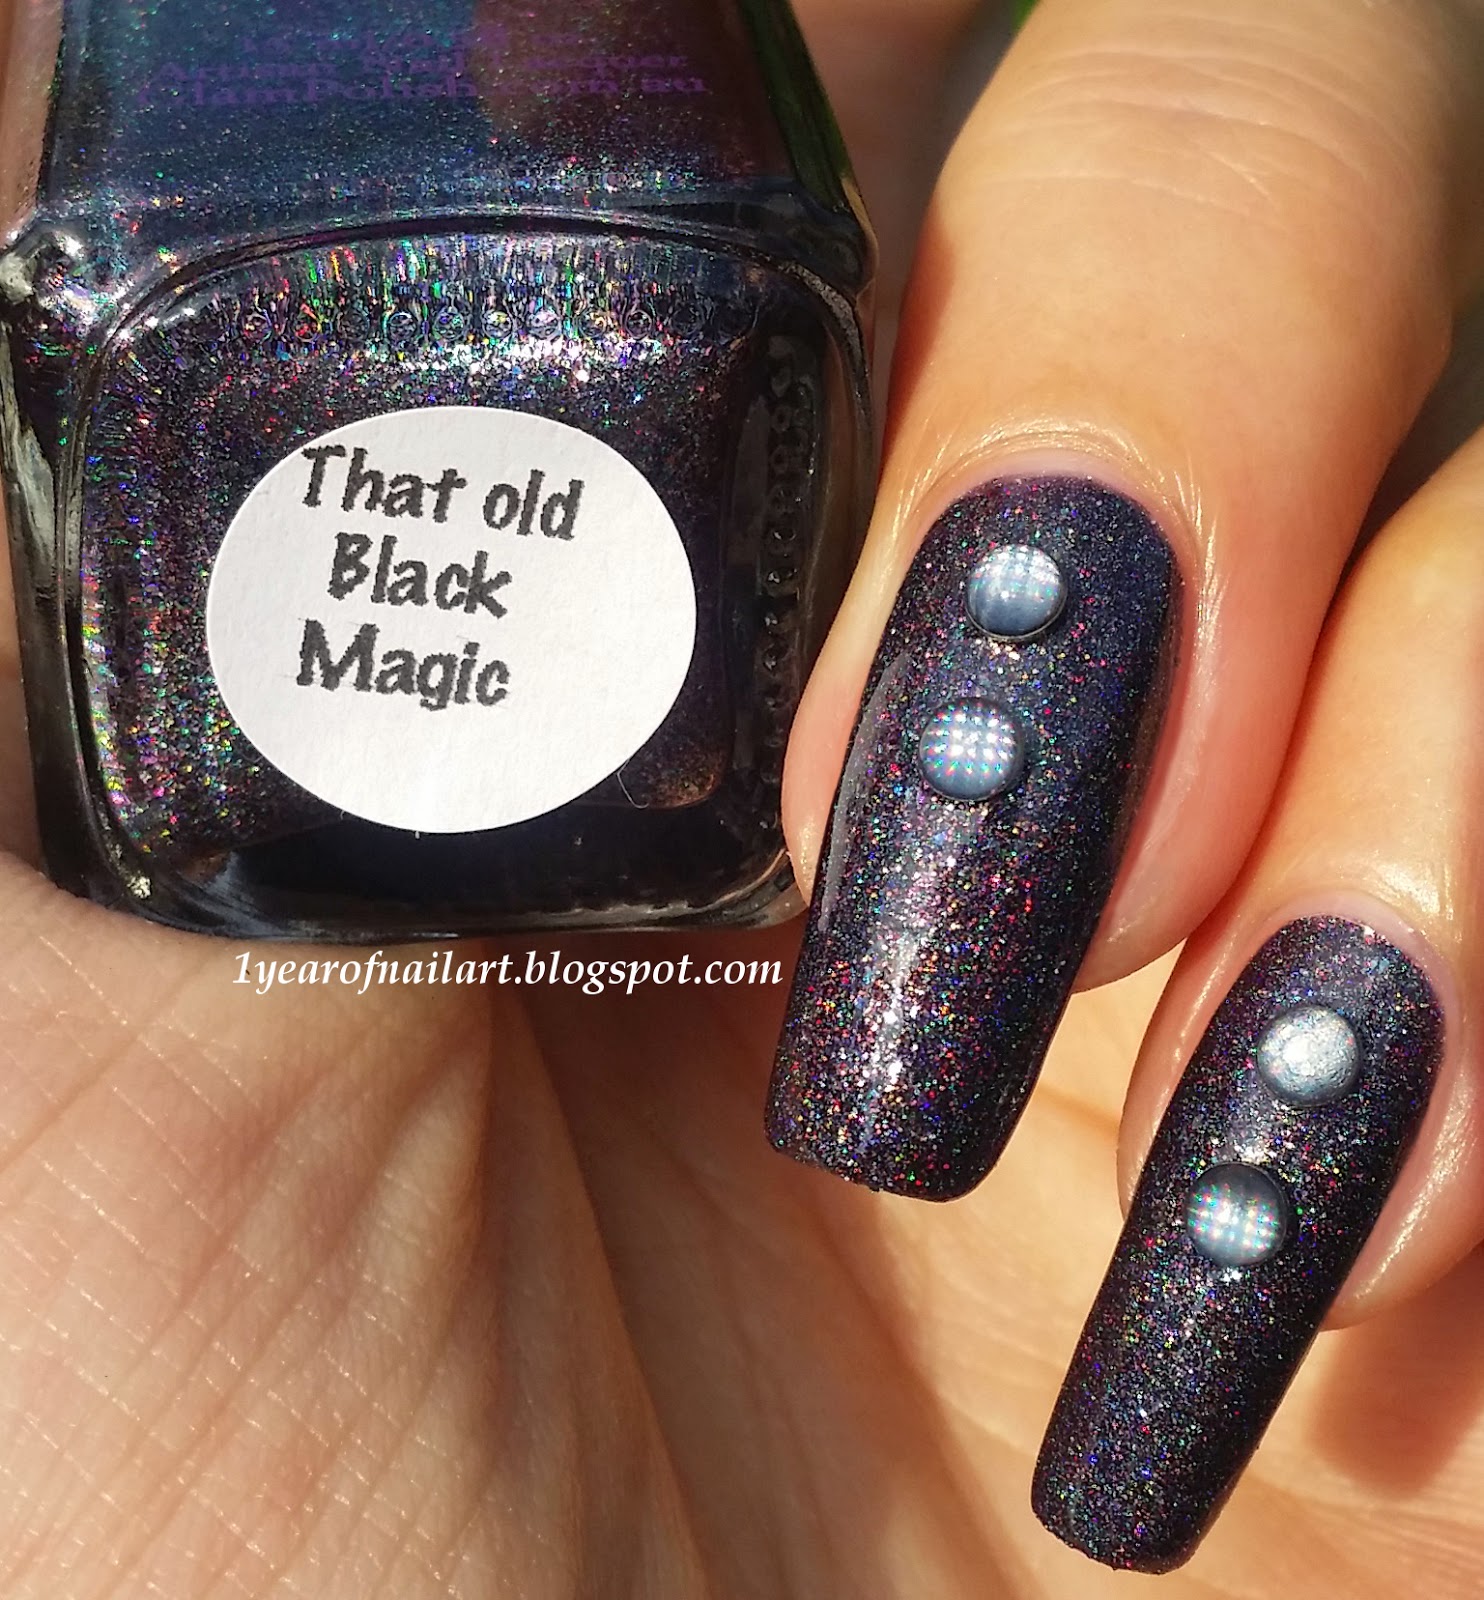
That old Black Magic is part of the Diamonds are a Girls Best Friend collection which was inspired by Marilyn Monroe.
The black base is filled with a mix of glass fleck glitters, micoglitters, and a touch of holographic dust.
Two coats is enough to make this beauty nicely opaque.
Finish is a bit textured but a topcoat immediately gives you a nice smooth finish if you want.

First up is a macro shot of this beauty.
Look at those gorgeous colorful glitters!


Picture above is taken in the shade. 
Like any other (holographic/glitter) polish this beauty needs some light to show its true beauty.
However this polish isn't just a dull black in the shade; The rich mixture of glitters makes it already interesting to look at.


But let's be honest...
It looks best in direct light!!
I could even discover a subtle linear holo but my camera refused to pick it up :(

And yes, those studs you're seeing, they came from BPS.
These work great with this polish as they remind me of diamonds and the rainbow colors like a holo is just perfect as well.


What do you think of this polish?

Sunday, May 25, 2014

Golden holo nails with 3D nail art

Today I have another Herôme polish that I want to show you.
Another holographic one to be more precise.
 
It's part of the W.I.C. (World Inspired Colors) line.
W.I.C. by Herôme is inspired by the richness of different cultures and every nail polish is named after a world city.
The polishes are oxygen permeable and enriched with Silica and Vitamin E for optimal care and brilliant shine.
 
Let's start with some swatches of W.I.C. by Herôme 73 Kingston:
 
 
Picture above is taken in the shade to show you the color without direct lighting.
It's quite dull but still a very pretty champagne like color that will match many outfits.
 
But will there be holo in direct lighting?
The following pictures are taken in the sun:


The polish is very rich pigmented and takes only 2 thin coats to be opaque.
Application was very easy and no dragging.
The color shifts in different lighting from beige/brown, champagne to gold.
The holo effect is scattered with a subtle prism.
The prism is more strong in real life though but not as strong as some other holo polishes.
 
Here is a macro shot of the polish:
 
 
I'm in love with this polish.
I'm more a fan of the holo's with strong prisms but this one would be a perfect nude holo.
Gorgeous for events when you need something subtle but still want to stand out with your nails.
 
For the nail art I chose for something bold.
As a contrast to the subtle and classic polish.
Something with more texture and 3D effect.
I've used the following polishes for this nail art:
- W.I.C. by Herôme 73 Kingston
- Maybelline 820 Winner takes it all!
- Classics Metallic 03
- Essence Metal Glam 01 Steel-ing the scene
 
I wanted to create some kind of circular gradient.
I started with the darkest color: Steel-ing the scene and used  a bigger dottingtool to place the polish at the outer side of the nail.
I dabbed as many times with the dottingtool and polish till I was satisfied with the texture.
I then worked my way in with the same techique and the lighter colors.
 
I'm not sure if my explanation is clear but if many of you want a tutorial for it...I'll make it.


Saturday, May 17, 2014

Holo watercolor nails

 
For more than 30 years Herôme has been the leader in hand- and nail care.
In the Netherlands that is.
The quality of their products is very good and they are medium priced.
Herôme: "Our approach is solid research and live up to what our products promise."
They also have a wide range of gorgeous nail polish colors.
And as I'm writing this I'm asking myself why I don't have more by this brand???
 
When I was shop hopping through local stores I found a store selling some Herôme mini nail lacquers (4ml).
The lightening in that store was horrible: I had trouble seeing which color I was holding.
There were some mini bottles which looked like plain silver lacquers but when holding one really close it looked like it had some shattered holo in it.
Well...you should know by now that I'm crazy for holo's so I grabbed two (just in case it turned out to be holo), one for me and one for my "growing give away".
 
And today I'm going to show you this mini lacquer by Herôme.
Good things come from Holland :D
 

Swatches Herôme mini nail lacquer (4ml) #314


OMG and this is going to be in my give away as well!
 
I'm in love again :D
 
Now, I wasn't really feeling it to make a nail art today.
We finally have some Summer weather again and I just wanted to enjoy it with my hubby and kids.
I chose for something really simple and done before (but not with holo).
I got this idea from Glitter.Gloss.Garbage
I used the OPI Sheer Tints to make the watercolor effect.
Using the regular polish brushes and randomly placing the colors on the nails.
 
 
The picture doesn't even do it justice!
I want to have this nail art on for...like forever :D
 

Saturday, May 10, 2014

Holo animal print nails

Thanks to +Kathleen Coultes I discovered I had never really done a holo gradient.
Which is weird because I love holo's and gradients.
 
I grabbed as many holo polishes as I could and decided it was a perfect opportunity to use some untried as well.
 
I've started by applying the lightest colors on the nails:
 
 
Polishes used (from left to right):
- Catrice Limited Edition Haute Future C03 iROSEdescent
- Catrice Limited Edition HOLOMANIA C04 Plum Me Up Scotty
- Catrice Limited Edition Haute Future C01 Eletrix Blue
- KOH Colours! 127 Metallic Green!
 
Looking at the above image I think it's fair to say that KOH by far has the strongest holo.
Application is much harder though and it also requires more coats.
 
After I made these nails I got the tip to only sponge one color onto the background colors but in this case I've sponged both colors onto the background.
I'm not sure if it will make a huge difference colorwise but it sure is easier application wise.
 
 
It was a rainy day and I had to take the pictures inside.
The above image was actually the best I could get :(
But gosh these were so pretty in the sun.
 
Polishes used at the tip side (from top to bottom):
- Layla Hologram Effect 03 Retro Pink
- Color Club 999 Eternal Beauty
- Layla Hologram Effect 07 Ocean Rush
- Catrice Limited Edition HOLOMANIA C03 Holo In One
 
For the nail art I decided to go with animal prints
I've used a detail brush and black acrylic paint to make the designs.


Tuesday, December 3, 2013

Day 337) It's my B-day :D

Today is my Birthday!
I actually wanted to give myself a day off :D
But this freaking challenge won't let me...;P
 
I did go for an easy look though.
Purple holo glitter gradient (which sums up all the things I love)
And some stamping (easy)


Saturday, June 29, 2013

Day 180) Nail art holo rose see through

After a very nice flight we've landed safely at Lisbon Airport.
We are staying at my parents place in Batalha.

We left The Netherlands with rain, wind and cold and now we are at a very sunny and hot Portugal.
Quite a change I think...but for the better of course ;D

At the last moment I changed my mind (about not taking any nail polish with me) and rapidly threw two holo's in my suitcase.

So, that's what you're getting today!

Step 1:
After the basecoat I applied a glitter holo (about 4 coats):
Kleancolor Nail Lacquer - 234 Chunky Holo Purple
Step 2:
Topcoat:
Essie - Good to go
Step 3:
With a striper brush and silver holo I made accents on the nails:
KOH Colours! - Platinum Silver! 133

On 4 nails I did a kind of diagonal French manicure with tiger stripes.
On the ring finger I did an accent nail with a rose see through.


That's it for today. Hopefully I can get some nail polish tomorrow!

Thursday, June 27, 2013

Day 178) Featuring rhinestones (1)

Today and tomorrow will be all about rhinestones.
Tomorrow will be the last day before we leave for our 3 week vacation and there is still a lot to do.
Rhinestones are easy and quick to use and therefore perfect for these two days.

And to be honest...they are so easily forgotten.
Ages ago I bought a big nail art wheel with about 2500 rhinestones in different shapes.
I maybe used 10 of them and then forgot all about it.

And I am not sure why...
Rhinestones can be so pretty and just give a nail art the elegant touch.

Before I show you my nail art, I have some swatches of China Glaze Holographic - 1171 Infra Red 81159 (which I used as my base color):
The next pictures were taken under a bright light
 
 
Although it's a pretty holo, I've seen better. Outside I had to twist my hand again and again to find the holo. But maybe direct sunlight will do a better job...
 
Now, for the nail art. I will not just apply some rhinestones, but try to do some elegant painting as well. I hope you like the ideas!
Thumb: Abstract with rectangular rhinestone in the middle
Index: Butterfly with rectangular, rain-drop and teardrop rhinestones
Middle: Frame with rectangular and square rhinestones
Ring: Snaky design with round rhinestone
Pinky: Leaf with a flower rhinestone
 

Saturday, June 15, 2013

Day 166) Gradient with holographic designs (elegant nails)

Hi lovelies,

In addition to the black&white and ombre/gradient nails of the past days I came up with today's nail art.
I really like this nail art and keep looking at it; it's elegant, feminine and a little mysterious because of the holo.
Interested?!
There is a short step-by-step:

Step 1: Make a gradient 
I chose for greys and white
Material:


*Essence Vintage District - 04 Get arty
*Catrice Natural Nail Lacquer
  Limited Edition NEONaturals -
  C05 Have A Good Day
*ICI Paris XL - Only You - White French
*Sponge


You can apply a white polish first to get opacity at once, but I don't think this is really necessary.
Put the sponge onto your nail to estimate the size of your nails; you do want all 3 of the colors on your nail and not just 2 or even empty spaces.
Now apply, with the size of your nails in mind, the 3 nail polishes onto the sponge.
The sponge might absorb some nail polish in the beginning, so keep this in mind while applying and repeat if you don't think it's enough.

Now, place the sponge onto your nail (white on the tip) and roll it over the surface of the nail (horizontal).
At least a few times so that the colors nicely blend.
Repeat this step for the other nails. Depending on the absorption of the sponge you'll have to apply the 3 nail polishes again. Not happy with the opacity? Sponge the nails again.


As you can see, you'll have some cleaning to do.
Putting tape on fingers and cuticles can help!
After cleaning I applied a topcoat.

Step 2: Make designs of your choice on the gradiënt nails (use a popping color like red, purple)
Material:


*Catrice Ultimate Nail Lacquer - 39 Black To The Routes
*China Glaze Holographic - 1171 Infra Red 81159
*Striper brush

I chose to do more elegant designs: flower, butterfly, heart, bow and feather.


Wednesday, June 12, 2013

Day 163) Nail art outline

Nail arts with outlines are there quite some time now and maybe even on their retour again.
I'm not really into outlines, especially those with a black outline and inner nude colour. It looks like you have a very huge health problem I think :-/
I do like the more classy ones with matte and glossy, gold and silver or the more cartoon ones.
Today I've tried to make my own unique outline nails. I hope you like them!

I created a colorful outline using 6 colours of nail polish:

  1. Bourjois 1 Seconde - 27 Green fizz
  2. Essence Colour & Go - 133 Oh my glitter!
  3. Catrice Ultimate Nail Lacquer - 02 Pimp My Shrimp
  4. Etos quick dry nailpolish - lightblue
  5. Catrice Ultimate Nail Lacquer - 27 The Pinky And The Brain
  6. Essence Colour & Go - 137 Wanna be your sunshine
You don't have to worry about the inner side of your nail. This will be covered soon. Just make sure your outline is neat.

Then I painted the inner side of the nail with a black nail polish, following the shape of my nails (Catrice Ultimate Nail Lacquer - 39 Black To The Routes). In this step you'll create your outline.
You can keep the nail art like this, but I had two reasons not to:
  1. I thought the black was too dark compared to the bright colours of the outline
  2. I wanted to try my new nail polish on a black background (Kleancolor Nail Lacquer - 234 Chunky Holo Purple), which is a holographic glitter nail polish.
Too bad the holo effect isn't well shown on the picture. Hopefully I can make a better one using daylight because I really love this nail polish and the holo really is there!


Friday, June 7, 2013

Day 158) Holo with corner frame

Yeah!
I finally got my first holographic nail polish.
It's pretty hard to get in The Netherlands. Especially a good one.
I've been in love with holo's for a very long time now; I just love the effect it has!

First some swatches of my holographic nail polish:

KOH Colours! - Platinum Silver! 133


I think holo's are just like effect topcoats, which means that it is nail art by itself.
Therefore today's nail art is a modest one.
It's all about this great nail polish!