Like I said before: When I buy stencils or water decals I'm always looking for the designs that are hard to do by hand or at least not as perfect as when you do it yourself.
I think it's a waste of money when you can do it yourself.
Although I prefer to handpaint my nail arts, I do think stencils and water decals are an invention for those less artistic.
That's why my blog also contains this kind of nail art.
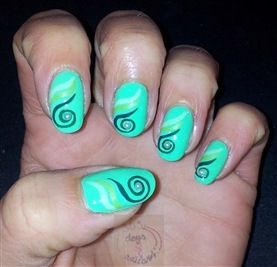
Today's waterdecals are for the complete nails. Of course you can always cut them in other shapes if you like.
The pattern consists of white swirls and transparency, which means there's a see-through for your nail polish.
.jpg)
Arts Queen
Professional Nail
Nail Tattoo
No BW009
White swirls
Step 1:
Paint your nails in the desired colour. I do recommend to use a dark colour because of the white swirls and the contrast it will make. Let it dry completely before you go further.
I've chosen to do an ombre to spice it up a little (and Iwanted to use my new polish ;-D )
Step 2:
Cut the water decals in the right size. Let it be well-cut at the curve of your cuticles and the width. The length should be longer than your nails; this is a further step.
Step 3:
Remove the plastic film. This is a critical step and most of the instructions don't include this information! If you don't your water decals get stuck on the film and will be useless.
On the left: paper with water decals
On the right: plastic film
Step 4:
Put the water decals in some water. In a few seconds you can slide the water decals from the paper or in some cases this already happened on it's own.
Step 5:
Put the water decals on the nail surface (I use my index finger of the other hand). Gently push and smooth it. As long as the water decals are wet they are easy moveable. Sometimes too easy ;P When they are in the right place, don't touch them anymore but let them dry!
Step 6:
When you follow the instructions it will say you'll will have to remove the surplus part and then topcoat it.
I do it the other way because I don't want to risk that water decals move.
First use a topcoat and wait for it to dry. Then remove the surplus part (first cut with clippers or scissors, then buffer it). For the best result and longer lasting nails I recommend that you do another coat of topcoat after buffering.
DONE!
They look great I think!
Only downside is that they are very fragile. The water decals easy crack when you're smoothing them on the nail surface. This doesn't show that well on the nails so it's an acceptable downside but it did frighten me.
What's your opinion on water decals in general? Are you a lover or a hater?

.jpg)
.jpg)
.jpg)

.jpg)
.jpg)
.jpg)
.jpg)
.jpg)
.jpg)
.jpg)


.jpg)


.jpg)


